Last Updated on July 10, 2024 by Alexpify
As the ecommerce market continues explosive growth towards nearly $7 trillion globally by 2025, more entrepreneurs and small businesses look to carve their niche by launching online stores. However, building the required web infrastructure and operations from scratch poses serious technology and logistical hurdles.
Enter Shopify – the leading all-in-one platform powering over 1.7 million businesses with the systems and solutions to sell online efficiently.
This comprehensive guide will explore exactly what Shopify offers, who uses it, and provide step-by-step instructions for signing up to launch your own potential ecommerce empire. Let’s dive in!
What is Shopify Exactly?
Shopify equips business owners with a cloud-based software suite containing all the functionality for managing ecommerce operations through an easy web interface. Consider it your virtual one-stop shop for taking a retail model fully online.
Specifically, Shopify’s core features span:
🛍️ Online Store Builder: Professionally designed themes/templates, drag-and-drop editing tools and seamless custom domain setup for showcasing products in a flash.
💳 Payment & Shopping Cart: Secure checkout with automatic sales tax calculations, support for global payment methods like major credit cards, Apple Pay etc.
📦 Order Processing & Shipping Logistics: Inventory and order tracking in real-time across sales channels with discounted shipping rates from USPS, UPS etc.
👥 Customer Profiles & Marketing: Robust CRM for collecting contacts, purchase history and browsing behavior enabling personalized loyalty features and targeted promos.
📈 Reporting Dashboards & Analytics: Key metrics across traffic sources, top products, conversions rates and sales funnels for optimizing growth efforts.
The platform essentially lets any small or medium sized business quickly launch an online storefront while handling all associated backend processes – no technical expertise required!
Next up, who actually uses Shopify and why has it become so popular?
Why Companies Trust Shopify as their Ecommerce Engine
Beyond developer friendly APIs allowing extensive customization capabilities for tech savvy teams, Shopify appeals to users across needs and skill levels:
Startup founders – Rapidly test selling products online at low cost without operational hassles
Local brick-and-mortars – Complement physical stores with scalable online sales channels
Product designers – Showcase innovative D2C products and build own brands
Influencers – Monetize engaged social media audiences with click to buy checkout
Service professionals – Diversify revenue streams by promoting online bookings/consulting
Shopify essentially enables anyone to capitalize on the promise of digital commerce – no wonder they now power over 1 million businesses from fledgling entrepreneurs to retail giants like GE appliances and Staples!
You don’t need an enterprising idea though to benefit – sometimes just migrating existing projects onto Shopify’s reliable infrastructure can unlock serious efficiencies through consolidated reporting and cheaper payment processing etc.
Now let’s explore actually signing up and launching your own storefront.
How to Create Your Shopify Account Step-By-Step
Ready to take the plunge? Here is exactly how to get started:
Step 1: Access Shopify’s Homepage to Register
Start by browsing to here Shopify (This is my referral link. You will receive a special offer of only $1/1 month, within the first 3 months) and click Sign Up in the top right corner

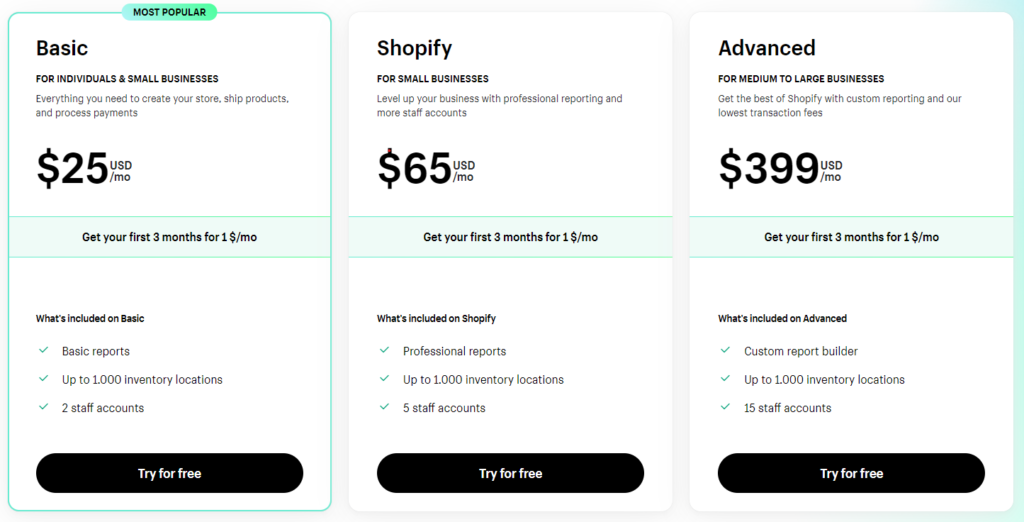
Step 2: Choose your Shopify Store Plan
On the signup page, you’ll be asked to enter your email address and choose between one of their three pricing plan tiers:
- Basic Shopify: $29/month (best for starting out)
- Shopify: $79/month
- Advanced Shopify: $299/month (adds advanced features)
Step 3: Select Your Preferred Domain Name
Next, you’ll choose a memorable domain name for your online store that aligns to your brand – for example, JanesHandmadeCandles.myshopify.com. Shopify helps suggest available names.
Tip: You can connect a custom domain you purchase separately later which looks more professional long term.
Step 4: Personalize Basic Settings
Over the next couple signup pages, you’ll enter essential business and account details like:
- Contact information
- Creating password
- Timezone
- Default currency
Shopify pre-populates certain locations and specifics based on your IP address and inputs.
Step 5: Select an Ecommerce Plan Add-On (Optional)
If selling mainly on platforms like Amazon, eBay or Instagram, Shopify lets you integrate inventory/order management through relevant add-on’s for a small fee. However, skipping is fine when starting out.
Step 6: Arrange Payment Method
The last step involves setting up billing details to pay for your monthly subscription plan through credit card. They offer free trials when first launching a store.
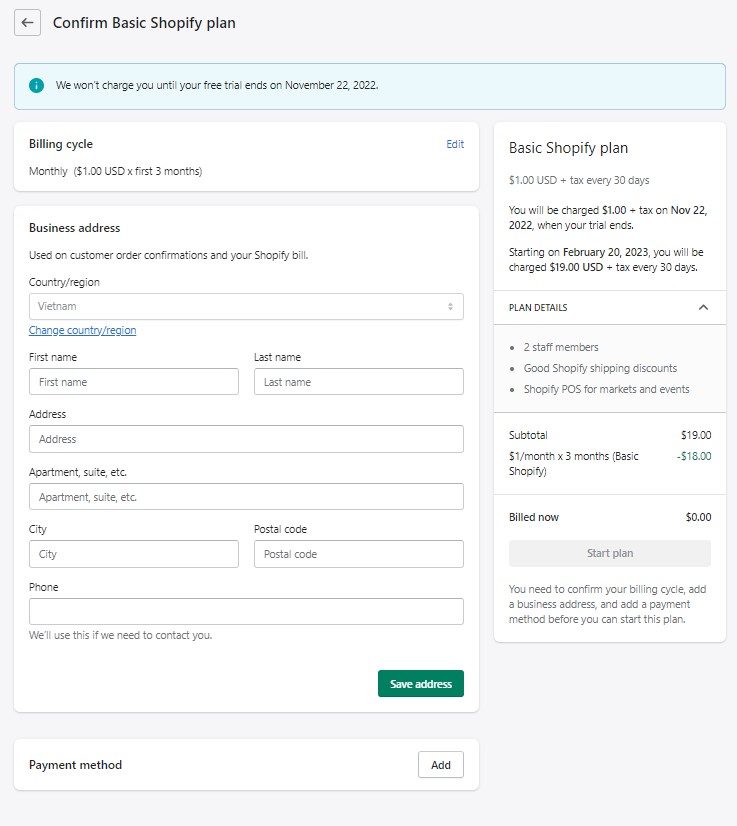
After completing checkout, welcome officially to the Shopify platform! 🎉 You can now access your dedicated partner dashboard and familiarize yourself with the built-in functionality before you populate products and go live selling to customers.
Take advantage of their exhaustive resources from webinars to community forums if ever needing troubleshooting help down the road. Global support staff also assists 24/7.
You’re now fully equipped to thrive in the world of ecommerce – time to put your entrepreneur hat on! Let those sales roll in!
We hope you found this walkthrough valuable. Please drop any remaining questions in comments below!

